Wednesday, March 17, 2010

Featured Artist :: Echoes of Stars' Designs


This week’s featured artist is Echoes of Stars' Designs!

Echoes of Stars' Designs – Art Pendants & Handcrafted Goodness

Senioritis: What’s your name, and where are you located?

Echoes of Stars' Designs: Juliane Bjerregaard, Waukesha, Wisconsin
Senioritis: Ahh, Wisconsin. Were you happy to see Mr. Favre come back to Green Bay for a game or were you one of the fans who was throwing cheese at him ;)

Senioritis: Can you give us a brief bio, please?
Echoes of Stars' Designs: I am a former middle school teacher who used to teach the relatively structured subjects of math and science. After being submersed in such structure all day, I needed a creative outlet. That’s when I started making pendants and other crafts. My friends all loved my pendants, but I never considered actually selling them until I had a few perfect strangers ask me where I had gotten them.
Senioritis: That's awesome! We have designed a few tshirts and think there's nothing cooler than when somebody asks where you got an item that you actually made.

Senioritis: Juliane, how would you best describe your style?
Echoes of Stars' Designs: Unique, artsy, girly, and fun.
Senioritis: Yup, those sound pretty accurate to us ;)

ceramic podflower pendant

Senioritis: What is your favorite color?
Echoes of Stars' Designs: Cobalt blue.

Senioritis: Juliane, are you a righty or a lefty?
Echoes of Stars' Designs: Righty
Senioritis: Hmm, many of our other featured artists are rightys as well, interesting.

Senioritis: Do you have a favorite quote?
Echoes of Stars' Designs: B is for BEAT! (I said it - referring to the B button on the X-Box controller while playing Halo 3. Yes, I'm a gamer.)
Senioritis: Hahahah, that's great. I have yet to play X-Box or any of the Halo games but I'm a big Wii fan; especially Wii fit and Shaun White Snowboarding.

sky gazers print

Senioritis: Juliane, if you could have lunch with any famous person, past or present, who would it be?

Echoes of Stars' Designs: President Lincoln – because he had dealt with such a horrible time in our nation’s history with such wisdom and grace. Was he perfect? No, but he was humble and a great leader.

Senioritis: If there's room at the table we wouldn't mind sitting in on that lunch. We have read a bit about our 16th President and one of the things that impresses us most was his people handling skills; we can all learn a lot from President Lincoln.

Senioritis: Do you have a favorite cartoon?

Echoes of Stars' Designs: The Smurfs
Senioritis: Smurfs, excellent choice. I haven't seen that cartoon in ages.

live well pendant

Senioritis: Where do you see yourself and your business in 10 years Juliane?

Echoes of Stars' Designs: I would like to see my business flourish enough so that I can permanently stay home and dedicate more time to my family. I would love to see my pendants in more consignment stores across the nation!
Senioritis: That sounds like a good plan to us! We noticed that your work is already available in quite a few brick and mortar stores in your area so it looks like you're off to a great start.

Senioritis: Where can we find you on the web?

Echoes of Stars' Designs: Check out my blog. It's a mixture of anything and everything that I find interesting or blog-worthy.

Senioritis: Very cool stuff and we love the layout. Is the red pencil a tribute to your former profession :)

vintage red beaded necklace

We'd like to send a huge thank you to Juliane for giving us a bit of insight into Echoes of Stars' Designs. Be sure to visit her Etsy shop for more art pendants and handcrafted goodness!

Garrick @ Senioritis

Tuesday, March 16, 2010

Mr. Wolfe's Quick Fix :: A Gimp Tutorial

A couple weeks back I had asked which aspects of photo editing people would most like to see covered in a simple step by step tutorial. After basic photo adjustments, the thing people were most interested in was removing the background from an image. So that's what we'll be covering today; bring out the Gimp!

In today's tutorial I will be playing the role of The Wolf and we'll cover a quick image fix, Gimp style. If you have no idea who The Wolf is you need to watch
Pulp Fiction again ;) If you would like to follow along but don't have Gimp's free photo editing software feel free to download it here.

Choose Photo

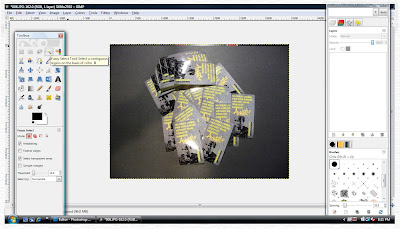
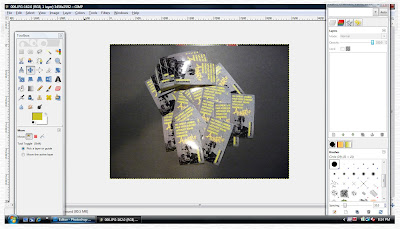
After you download and open Gimp choose a file that you would like to work with, or you can use ours (just right click save). We decided to go with a picture of our business cards; the picture is ok but its uses are limited because of its background. We will walk through removing the image's background step by step. Just click on the pictures as we go to make them bigger ;)

Open Photo

If this is your first time using Gimp, or a computer ;), open a file by going File>Open and then locate and double click on the photo you would like to work with. Once the file is open you will notice several things on the screen. On the left hand side of the screen you will see your basic tools while on the right hand side of the screen you will see your layers, channels, brushes, gradients dialogs etc. Feel free to reposition and resize these window as you see fit :)

Our photo is now open and you can see that it has a black paper background, our goal is to remove the black paper.

open file

Gimp offers a bunch of tools so we're going to take a quick look at a few of them and see how successful they are in helping us remove the background from our image.

Fuzzy Select Tool

fuzzy select tool

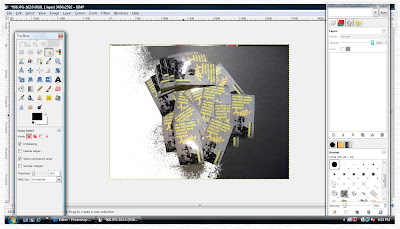
The first tool we're trying is the fuzzy select tool. This tool is similar to the magic wand tool in Adobe's Creative Suite software. Select this tool and click on an area on the left side of your image and you will see what it does :) A selection of your image should now be active. Hit delete (not backspace) and this should remove the selected area like so:

after fuzzy tool select

That was pretty good but it left a bit of noise around the left side of our image. Let's give the next tool a shot.

Color Select Tool

color select tool

The idea behind the color select tool is that we can click on a specific color in our image and all parts of our image that are that color will become active and we can edit them. In an ideal world if we click on the black on the right side of our image it will all be selected and we can delete it. Let's click on the black on the right side of our image and hit delete and see what happens :)

after color select

Well, good news is this deleted some more of our background, bad news is the black was too similar to the color in our business cards and deleted parts of the image that we want to keep. Let's undo the color select, Edit>Undo Color Select. While the color select tool may work well for your image it wasn't very helpful for ours.

We should now be looking at the same image we had after using the fuzzy select tool. Let's
use the fuzzy select tool on the right side of the image (not pictured). Now let's take a look at one final tool.

Free Select Tool

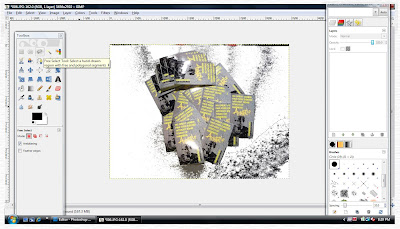
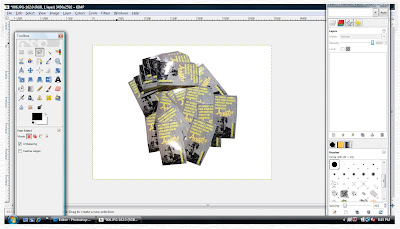
This tool is similar to the lasso tool in Adobe's Creative Suite software. This tool will allow us to lasso and select specific areas of our image. Let's use this tool to select some of the noise on the bottom right of our image. Just lasso around the area.

free select tool

Once this area is selected we can now hit delete and this will remove the selection.

after free select tool

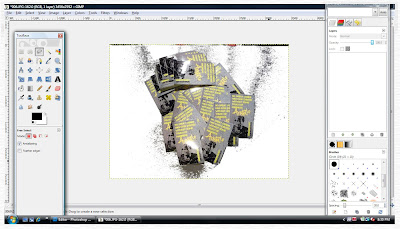
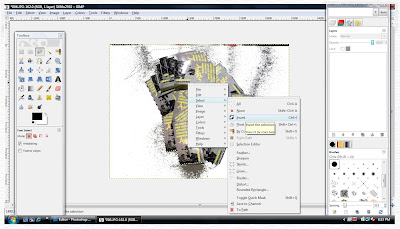
Wow, that looks like what we're after. The free select tool removed the unwanted black background from our image and didn't leave any noise. Let's use the free select tool to clean up the rest of the image. To do this we're going to outline the area that we want to keep. Once the area that we want to keep is fully selected and active right click>select>invert and then hit delete.

select inverse


Inverting the selection chooses everyhing except the area we outlined with the free select tool. When we hit delete we are now left with our business cards on a white background. There may be a few spots left so feel free to use the free transform tool to give your image one last good cleaning.

Time to smile, you have now successfully removed the background from your image =) It seems to us that the best technique for removing the background from an image in Gimp would be a combination of the fuzzy select tool and the free select tool.


after final clean up


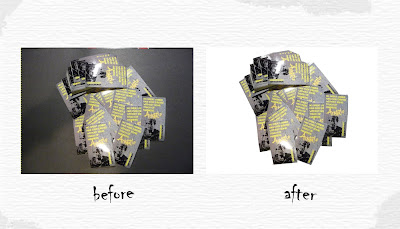
A quick before and after just to recap:

before and after


Now using the image we just created we can make a new banner:

new banner

Conclusion

Some quick observations from Mr. Wolfe. Well, it even took The Wolf a little while to pull this one off using the Gimp. While Gimp is a great option for free software it ran a little slow on my computer, granted I could just have too much stuff on my computer so I won't hold this against Gimp. After using Picasa last week (last week's tutorial), Gimp, while designed for more detailed editing, is definitely not as intuitive as Picasa. This was our first time using both programs.

If you found this tutorial somewhat useful and would like to purchase some basic software that would allow you to perform similar tasks (and way more) we highly recommend Adobe's Creative Suite lineup. Mr. Wolfe can make the same adjustments to an image in Adobe's Photoshop Elements software in roughly 3 minutes and 37 seconds ;)

We hope you enjoyed this tutorial and that it was somewhat helpful. If you have any questions just let us know in the comments section and we will be sure to get back to you. If there's anything else you would like to see covered just leave a comment and we'll see if we can make it happen. Have a senioritis day!

Garrick @ Senioritis


Monday, March 15, 2010

Tattoos: Not as Taboo as They Once Were

From the time I was in high school I had always wanted a tattoo. Not only did they look incredibly badass, but I thought they were a great form of self-expression. A way to show your style and ideals, as well as remember an important experience. My parents knew of my desire to get one and were, unsurprisingly, against the idea. They thought tattoos were trashy and against the Jewish religion and not something they wanted their youngest child to get. That paired with the fact that I am terrified of needles seemed to be all the reason I needed to not get one. After six months of studying abroad in Australia and being on my own, I decided I wanted something permanent that would serve as a constant reminder of the great times I had had and the independence I had gained. And so, the day before I left Australia to come home I decided it was finally time that I got my tattoo. I went with my two best friends that I had been traveling with during my stay in Australia. We all got something that would remind us of our wonderful times in Oz and so I decided to get a lizard. As I have said in previous posts, I love nature and so I wanted something from the natural world that represented Australia. Hence, I have a lizard on the inside of my right ankle.


My parents' reactions were varied but they both seemed to wonder how I expected to be a professional with a tattoo that could not so easily be hidden in my work attire. After giving much thought to this question I realized that they were too old to understand. Times they are a changin, having a tattoo or a piercing isn't such a huge deal anymore. It is no longer just the punk rockers or criminals who have them. Celebrities such as Angelina Jolie have multiple tattoos and have no qualms about showing them off.

Professionals too are sporting tattoos. I recently went on an interview for Pace Law School ( I got in by the way) and the lady interviewing me had a tattoo on her foot. She was not a secretary or an associate, but she was a partner. She was brilliant and kind and was very knowledgeable. It's about time that people understand that body art is a form of expression just like poetry or journaling and that it does not mean that a person is not smart or qualified for a good job.


Keep up the good work staying lazy.

Jill @ Senioritis

Sunday, March 14, 2010

Everything That's Green

Because everyone likes to celebrate St. Patrick's Day a bit in advance (and because on Wednesdays we traditionally offer our Featured Artist Series), this weekend's update is a tribute to everything that's green. Enjoy!!


There's nothing like green hair to really show the holiday spirit! PaperMuse's sea goddess is certainly on to something.


In case you're wondering, green floral wall paper like this created by FlowerOfTheDead actually does exist! Our aunt has it. It's fantastic.


Even our electronic devices deserve to take part in the festivities. Check it out - TheFigLeaf has all different colors.


This is just great. We really like Sascalia's work!

We hope you enjoyed just some of the green gems our fellow etsy folk have to offer! Stay tuned for lots more to come this week!

Beth @ Senioritis

Friday, March 12, 2010

Friday Finds 3.11.10

Welcome to this week's segment of Friday Finds. This week we have found some colorful inspiration from the land of Etsy. We will also pay tribute to one of our newest Famous Seniors. Happy Friday!

joelquiggle

Summed up in a single word, joelquiggle's work is awesome! The first piece of his we came across was Robot Party (pictured below). His Limited Edition offerings are great and feature some sweet color work. To see more of joelquiggle's work check him out on
Etsy.

adam and eve

robot party

heaven

rescued


mattcrump

We stumbled across mattcrump's work earlier this week while looking for some cartoon illustrations. His fresh style and use of bright colors immediately caught our attention. To see more of mattcrump's style pop by his
Etsy shop or his site.

fractal ghost surprises the town

getting out of bed

in the playpen

battle of the green hand

audreypongracz

We love vinyl and we're always on the lookout for some trick one off customs. We came across audreypongracz's custom munny and were absolutely blown away. The awesome colors and intricate details are simply amazing. To make things even better we discovered that she has an Etsy shop showcasing some more of her work in other mediums. To see more of her work please visit her Etsy shop or her site.

custom munny


senioritis

"I once shot an elephant in my pajamas, how he got in my pajamas I'll never know." This week we are paying tribute to a man who added some color to the lives of many through his comedy, Groucho Marx. To see more of our tributes please visit our Etsy shop. Thanks for taking a look.

groucho marx


Featured? Why not grab a banner?


Garrick @ Senioritis